Preface 1
In this installment you will get some hardware stuff (Making a Celectronic D10 thermal POS printer into something more usefull), a LPT library to use with every LPT/parallel/Centronics printer and some ESP8266 stuff.
Vorwort 2
Die Idee entstand seinerzeit, als Schmidt noch lustig war. Woran Feuerstein und Wolpers schuld waren. Und der flauschige Platz abends im WDR3. Als sie sich trennten, ging es mit Herrn Schmidt rapide bergab. Aber ich schweife ab.
Seinerzeit also ging Herr Schmidt eines Tages in den Kölner Hauptbahnhof und las über die Ansageanlage aus Hegel. Oder Adorno auf Schalke. So jedenfalls in meiner Erinnerung.
Daraus entstand die Idee, dass ein Drucker auf Knopfdruck ein Stück erbauliche Literatur ausdrucken möge.
Irgendwann gab es mal den Drucker. Irgendwann später gab es den ESP8266. Und dann ein regnerisches Wochenende.
Main()
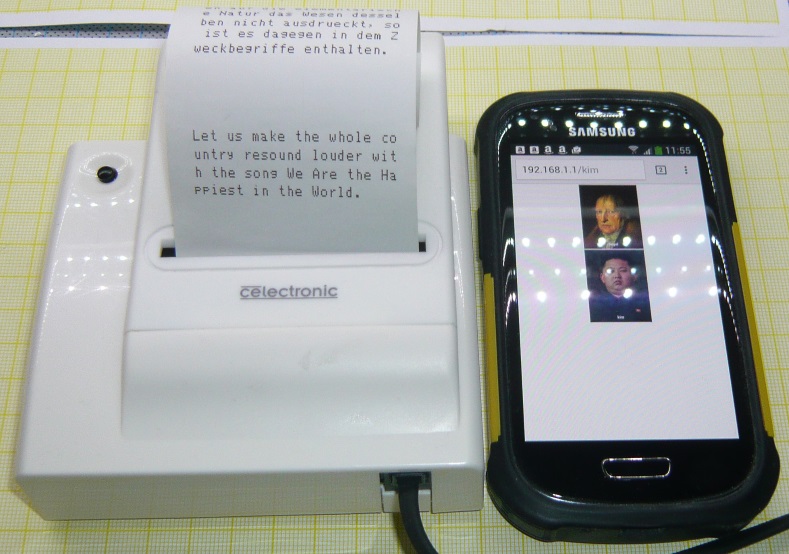
The Celectronic D10 thermal POS printer might be one of the bigger fails in printer industrie history. It is so limited that it is almost useless: no graphics, no definable character set and a mechanical layout that printing pictures probably is impossible due to stripes between lines.
(In theory it could be possible to replace the SIEMENS SAB-C501G-1RN with a pin compatible ATMEGA8515. You would eventually end up with a shitty working thermal printer that still might only print uggly graphics. Not really worth the try and efford.)
The D10 is a steal: 10 € including shipping on ebay.
The concept
ESP8266 does not have a lot of ports, so I needed to create more ports. Port extender (like MCP23017) would do the job. But I’m cheap so I opted for a 74hc595 shift register. This has 8 bit, so enough for 8 data lines. Still needed: strobe to talk to the printer and busy to hear back from it.
To avoid killing the ESP8266 with 5V the busy is clamped by two 1N4148. strobe worked out of the box by a wire.
Add some vegetables for power regulation (AMS1117 3.3), reset logic, jumper for programming and serial connection to your personal preferences. All resistors are 10k.
The conversation
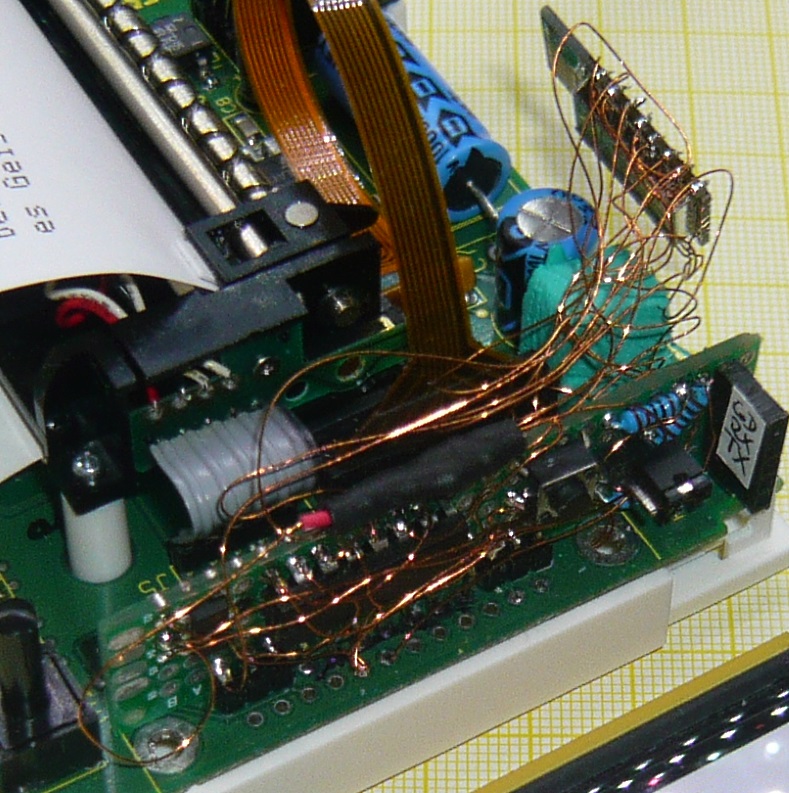
Desolder the printer connector. Try not to kill too many copper traces.
After that it is possible to fiddle in a small prototype PCB with 90° angled pin strips. The pin mapping does not fit, so remove the plastic from some.
Place the 74HC595 in a way that it matches up with the data ports. Add the other stuff where you find a place. Connect them with 0.3mm enameled copper wire.
(Working with enameled copper wire is really easy and fast. Fire up your solder iron to about 350° C/670° F. This will burn the isolation.)
Follow the schematic:
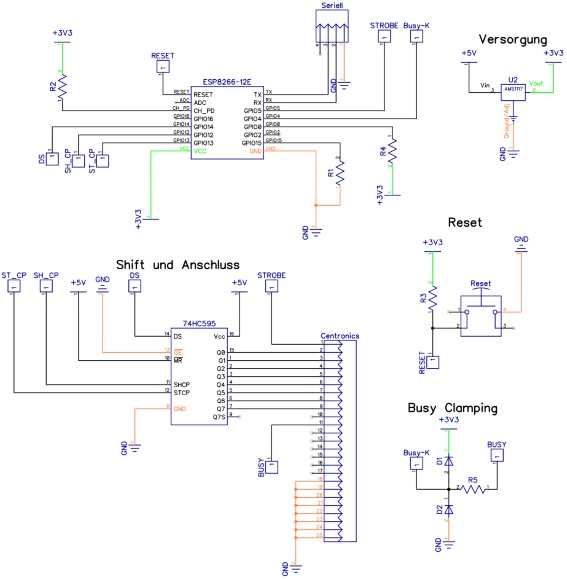
Schematics PDF is attached at the end.
the Code Part I
For the printer a small Arduino lib has been created. It inherits from the Print class, so instead of Serial.print("Fish") a simple LPT.print("Fish") does the job.
// inline guard. Did I mention that c/c++ is broken by design?
#ifndef LPT_h
#define LPT_h

#include "Arduino.h"
#include <inttypes.h>
#include "Print.h"

class LPT : public Print
{
  private:
      const unsigned long PrtStrobeTime = 4; // ms . noone knows...
      const unsigned long PtrWaitLimit = 5000; // ms . unknown, too.

      uint8_t _DS;
	  uint8_t _ST_CP;
	  uint8_t _SH_CP;
	  uint8_t _STROBE;
	  uint8_t _BUSY;

      void c74hc595Out(const byte data);
  public:
    LPT();
    size_t write(uint8_t data);

    void begin(uint8_t DS, uint8_t ST_CP, uint8_t SH_CP, uint8_t STROBE, uint8_t BUSY);

    boolean isbusy(void);
};

#endif
Just use the usual rundown: copy the folder into you library folder, restart IDE. Bingo.
Usage of the LPT lib is simple:
#include <lpt.h>

LPT lpt;

// ports depend on you personal believes...
const byte Pin595Data = 12;          //
const byte Pin595SH_CP = 15;         //
const byte Pin595ST_CP = 13;         //
const byte PinPrtStrobe = 4;         //
const byte PinPrtBusy = 5;           //

void setup() {
  // Set ports
  lpt.begin(Pin595Data, Pin595ST_CP, Pin595SH_CP, PinPrtStrobe, PinPrtBusy);

  lpt.print("I feel good.");
  lpt.println();
}


void loop() {
}
Ok, I lied. Usage might not be that simple. Because the D10 is so slow it is a good idea not to push an entire chapter to the printer and let it loop through the characters.
I ended up calling from loop():
void printqueueworker(void) {
  static unsigned long ticker = 0;

  if (millis() - ticker > 100) {
    if ( (printerbuffer != "") && (! lpt.isbusy()) ) {
      String buffer;
      if (printerbuffer.length() <= 9) {
        buffer = printerbuffer;
        printerbuffer = "";
      } else {
        buffer = printerbuffer.substring(0, 9);
        printerbuffer = printerbuffer.substring(9);
      }
    }
    ticker = millis();
  }
}
the Code Part II
Now we need to set up our entire program.
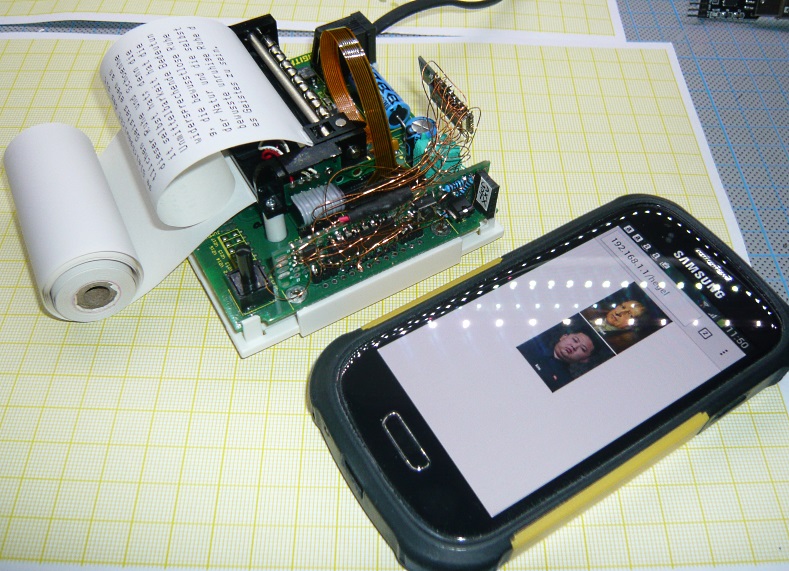
Basic outline: I have some text files that contain multiple lines of text separated by CR (\n). Lets call the line a slogan and the file a slogan file. So the project becomes the Sloganizer. Each text file has an JPEG-file as a graphic representation and that I give no name.
At startup for every slogan file the existance of an index file is checked. If it does not exist it is created. It contains the absolute file positions of the CRs. It is a simple binary file (unsigned long), so file size gives the number of lines times four.
So we end up with /hegel.txt, /hegel.jpg and /hegel.idx.
An access point is set up, a web server is set up and a DNS server is set up. DNS is used to redirect every web request to any web page to my web server. (That works only so-so.)
An index page is created from slogan file names, links to graphics and pseudo calls to links that will initiate the print process. Web server logic is placed into the "onNotFound"-event because it’s convenient.
Incoming web requests are checked and perhaps granted by printing a random slogan from one of the files.
Not that complex.
To upload the slogan files and graphics I used the process described for the ESP8266FS tool. It is somewhere on the github page of esp8266 arduino stuff.
the Code Part II – Details
Code is attached, just open it as a project. No magic inside.